DMA Fusers Explained — What They Do and How to Choose One
The Problem: Two PCs, One Monitor
You have a research PC and a target PC. Two machines, one workspace. Switching between monitors is exhausting, error-prone, and kills your workflow. Every glance away costs you time and focus. A fuser solves this cleanly: it merges the video output from both PCs into a single HDMI or DisplayPort feed going into one monitor. You see both screens overlaid, exactly where you need to look.
How Overlay Synthesis Works
A fuser isn’t just an HDMI splitter. It’s an active video processor that takes two incoming video streams and combines them into one. Here’s what happens under the hood:
Your research PC outputs video to the fuser over HDMI or DisplayPort. Your target PC outputs video to the fuser over a second HDMI connection. The fuser’s onboard processor reads both signals simultaneously, interprets the video data, and synthesizes a single output that combines elements from each. This happens in real-time with minimal latency—typically 5–15 milliseconds of processing delay.
The result is a merged image on your monitor. You might see your research PC’s desktop on the left half and your target PC’s screen on the right half. Or you can layer one over the other with transparency. Or split by app window. The flexibility depends on your fuser’s firmware, but the core principle is always the same: two video streams become one.
Resolution and Refresh Rate Specifications
Modern fusers support 4K at 60 Hz over HDMI 2.0. That’s 3840×2160 pixels at 60 frames per second. In practical terms, it’s sharp and smooth for both desktop work and gaming.
If you’re chasing higher refresh rates—144 Hz or 240 Hz—you’ll need DisplayPort. HDMI 2.0 maxes out at 60 Hz for 4K. DisplayPort 1.4 can push 8K@60Hz or 4K@240Hz, but not all fusers support it yet. Check the specific model’s specs before buying.
For detection research, 4K@60Hz is plenty. You’re not gaming competitively; you’re monitoring multiple overlaid views. Refresh rate matters less than resolution clarity.
The Three-Cable Setup
Every fuser setup uses the same basic topology:
Research PC outputs video to the fuser. Target PC outputs video to the fuser. Fuser outputs the merged image to your monitor. Power cable for the fuser (some models are USB-powered, others need a separate supply). The research PC also controls the target PC via DMA card, which connects via USB. So your desk has: monitor cable, two input cables (from both PCs), power for the fuser, and one USB cable for the DMA card. That’s five cables total, but it’s clean and modular.
DisplayPort vs. HDMI Considerations
HDMI 2.0 is industry standard. It’s cheaper, widely supported, and reliable. Most monitors have at least one HDMI input. Use HDMI if both your research PC and target PC support it.
DisplayPort is faster and newer. Monitors with DisplayPort are less common, but if you have one, you get better bandwidth headroom and the option for higher refresh rates. Some fusers support one HDMI input and one DisplayPort input, letting you mix and match depending on what your PCs output.
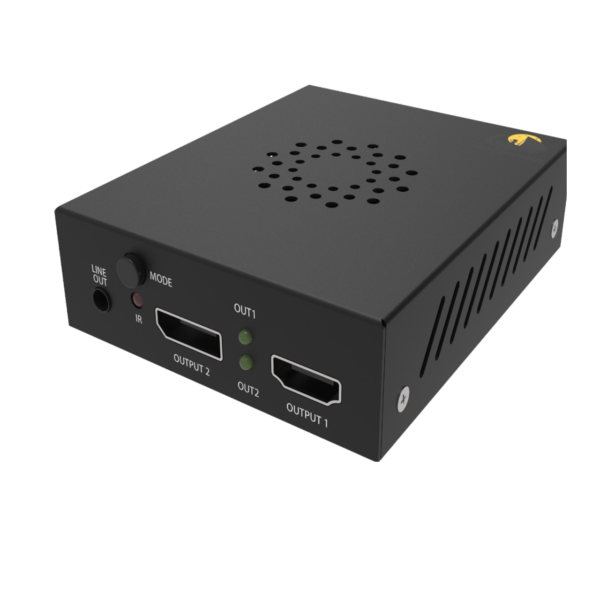
The CaptainDMA Fuser supports both standards, so you’re not locked into one or the other. Plug in whatever your hardware has available.
Latency and Timing
Processing delay matters in detection research. When you interact with your research PC—moving the mouse, clicking a button—you want to see the result immediately. A fuser adds 5–15 ms of latency as it captures and combines the video frames. That’s imperceptible to humans; you won’t notice a lag.
The bigger latency hit comes from USB and network overhead if you’re controlling the target PC remotely. But the fuser itself isn’t the bottleneck.
Compatibility with Detection Hardware
Fusers pair perfectly with DMA cards and input routing devices. A typical detection research setup looks like this: DMA card in the target PC, detecting and reading memory. Fuser merging video from both PCs. Input device (like the KMBox NET or Macku board) routing your keyboard and mouse inputs to both PCs as needed.
All three components are independent—they don’t interfere with each other. They work together seamlessly because each handles a different part of the workflow: memory access (DMA), video (fuser), input routing (KMBOX or Macku).
Setting Up Your Fuser: Step by Step
Power off both your research PC and target PC. Connect the HDMI or DisplayPort cables from each PC to the fuser’s inputs. Connect the fuser’s output to your monitor. Plug in power for the fuser. Power on your target PC first (the one you’ll research on). Power on your research PC. Switch your monitor input to the fuser’s output. You should see a merged image appear. If it doesn’t, check that both PCs are outputting video and that the fuser firmware recognizes both inputs.
Most fusers auto-detect and auto-blend the two signals. Some models have firmware settings for how to merge them—side-by-side, layered, windowed, etc. Consult your specific fuser’s manual for customization options.
Common Fuser Models and When to Choose Each
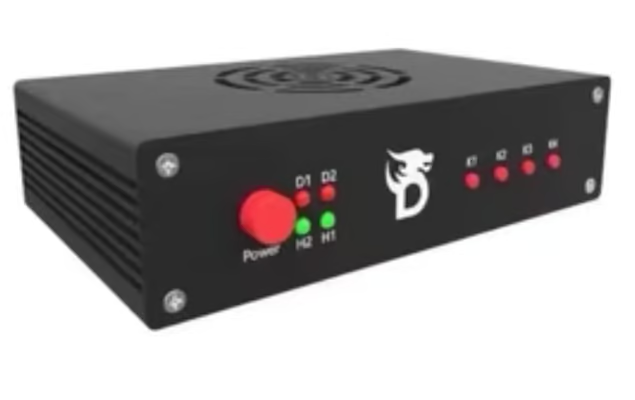
The Dichen Fuser is reliable and feature-rich. It supports HDMI 2.0, handles 4K@60Hz, and has solid firmware. It’s a safe choice if you’re new to fusers.
The CaptainDMA Fuser is newer and adds DisplayPort support. If you have a modern monitor with DisplayPort or you’re planning to upgrade to one, this gives you future-proofing. It’s worth the extra cost if bandwidth headroom matters to you.
Both work; pick based on your monitor’s connectors and your budget.
Troubleshooting Video Issues
If you see a blank screen, check that both PCs are outputting video independently. Use each PC with the monitor directly (before the fuser) to confirm. If one PC works and the other doesn’t, the fuser might not recognize that input. Restart the fuser or try different cable runs.
If you see one image but not both, the fuser may need a firmware update or settings adjustment. Most fusers ship with a default merge mode; check the manual for how to change it.
If latency is unexpectedly high, verify that the fuser has adequate power. USB-powered fusers can lag if your PC’s USB port has insufficient current. Use a powered USB hub if needed.
Why Fusers Beat Software-Only Solutions
You could use software KVM switches or remote desktop apps to manage two PCs from one keyboard and mouse. But these introduce network latency, require software running on the target PC (which changes its state), and create a single point of failure. A hardware fuser is independent—it doesn’t care what OS runs on either PC, doesn’t require drivers, and works even if the target PC crashes.
For detection research, that independence is critical.
Building Your Complete Dual-PC Research Lab
A fuser is one piece of a larger setup. You need a DMA card for memory access, a fuser for video, and an input device for control. The DMA Bundle brings all three together—card, fuser, and Macku board—at a bundled price. It’s the simplest way to build a professional research lab.
FAQ
Can I use a fuser with any monitor?
Yes, as long as your monitor has an HDMI or DisplayPort input. Older monitors with DVI or VGA only won’t work. If you’re shopping for a new monitor, one with both HDMI and DisplayPort is ideal for maximum flexibility.
What if my two PCs output different resolutions?
The fuser will attempt to scale them to match. If your research PC outputs 1440p and your target PC outputs 1080p, the fuser will upscale or letterbox to unify them. Check the specific model’s manual for how it handles mismatched resolutions.
Can I merge more than two video streams?
Most consumer fusers support exactly two inputs. Professional video mixers exist but are expensive and overkill for dual-PC setups. Stick with two inputs unless you have a very specific use case.
Is the fuser detectable by anti-cheat software?
No. The fuser sits between your monitor and your PCs’ video outputs. Anti-cheat software can’t see it because it’s a passive (or semi-active) hardware device. It’s invisible to the OS.
How much does latency add?
5–15 milliseconds for the fuser to process and combine the video. This is imperceptible to the human eye and won’t affect your workflow. Network or USB latency from your DMA connection will be your bigger bottleneck.
What if my target PC doesn’t have HDMI or DisplayPort?
Modern PCs all have one or both. If you’re working with very old hardware, you might need adapters (DVI to HDMI, VGA to HDMI etc.). These work but add complexity. Aim for hardware with native HDMI or DisplayPort if you can.
Can I use the fuser with a laptop?
Yes, if your laptop has HDMI or DisplayPort output. Most do. Desktop setups are more common because they’re cheaper and more flexible, but a fuser works just as well with a laptop target machine.
Where do I get support if the fuser isn’t working?
Reach out to the DepShop community at deprimereshop.com/discord. There are experienced users who’ve debugged every common fuser issue. They’ll help you get video merging quickly.
Related Guides & Software
A fuser is one part of a complete DMA setup. For the full hardware picture, see the DMA Card Guide. When you’re ready to find cheat software that works with your DMA rig, DepShop carries options for Escape from Tarkov and Arc Raiders. DepShop also stocks custom DMA firmware for cards that need BE/EAC/ACE bypass.